If you have ever built a login system from scratch — registration, password reset, session management, credential hashing — you know how much time it takes. And no matter how thoroughly you test it, that nagging feeling remains: are you actually handling passwords securely?
Then comes the second project, and you find yourself writing the same thing all over again. Same tables, same logic, same doubts — except now you have duplicate password handling spread across multiple codebases, often implemented differently each time.
There is a better way: use an Identity Provider. This article covers what that means, how it works, and why Keycloak is one of the most solid choices for web applications and microservices.
The Problem: Identity Silos
Imagine three applications in your organization: an HR tool, a CRM, and an email client. Each one manages its own credentials independently.
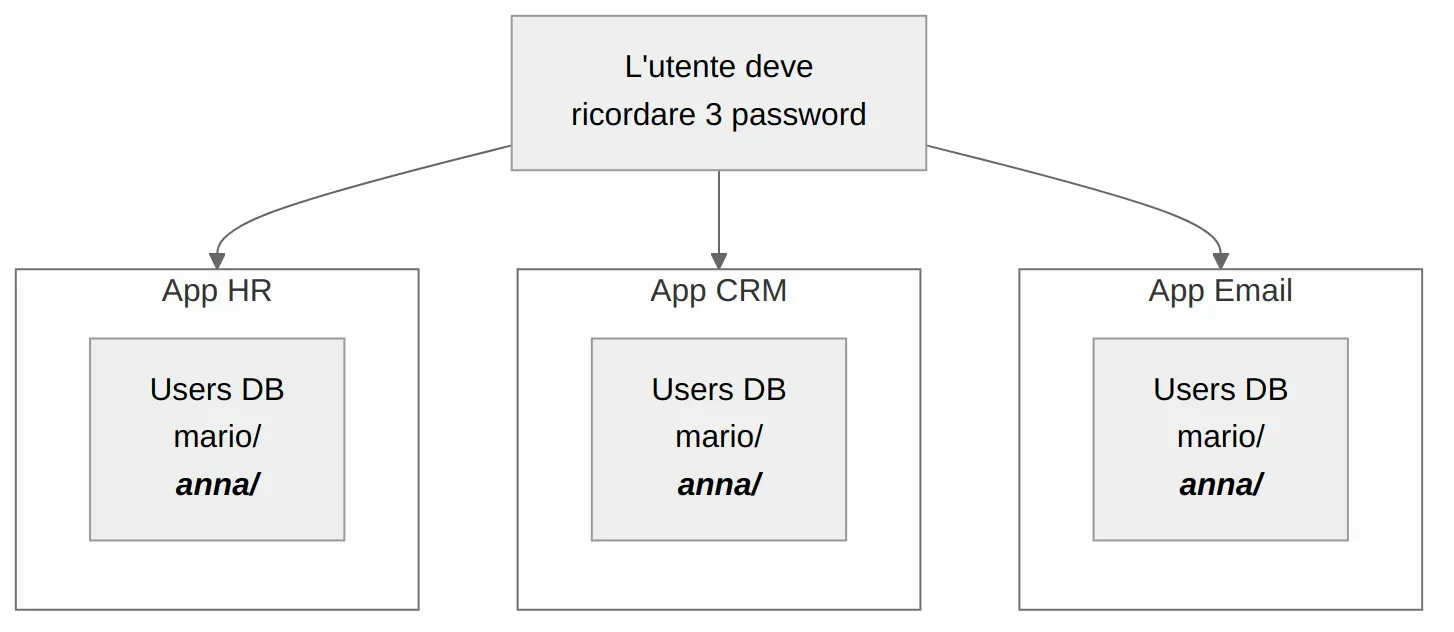
The problems with this model are well known:
- Duplicate passwords: users reuse the same password everywhere, or forget some of them
- No Single Sign-On: a separate login for every application
- Fragmented management: when an employee leaves, they need to be disabled across N different systems
- Inconsistent security: each application implements (or doesn’t implement) MFA, lockout, and audit logging in its own way
Modern architectures compound the problem. A typical project today might have a SPA, a REST API, five microservices, and a mobile app. Each one needs to know who is calling it. Reimplementing authentication logic in every component is not sustainable.
The Solution: A Centralized Identity Provider
The idea is straightforward: remove authentication from your applications and centralize it in a dedicated component. Applications no longer manage credentials — they receive signed tokens from the Identity Provider and validate them.
In practice, the user logs in once to Keycloak, and from that point on, every connected application receives a token confirming who the user is and what they are allowed to do. This is the principle of Single Sign-On (SSO).
Applications never touch credentials — they only verify that the token is valid and was signed by the IdP. Code that never handles passwords cannot mishandle them. An employee leaves the company? Disable them in one place and they lose access everywhere.
Enter Keycloak
Keycloak is an open source Identity Provider, originally built at Red Hat and released under the Apache 2.0 license. It is not a framework to embed in your code — it is a standalone service. You start it, configure it, and it takes care of authentication, authorization, and user management.

What it offers in concrete terms:
- Authorization Server: implements OAuth 2.0 and OpenID Connect (OIDC). Applications delegate authentication to Keycloak following open standards.
- User Federation: already have an LDAP or Active Directory with thousands of users? Keycloak connects to it and uses it without migration.
- Social Login: login with Google, GitHub, Facebook — configurable from the admin console, no custom code required.
- Single Sign-On: one login for all apps. Log out from one, log out from all.
- Admin Console: a full web interface for managing users, roles, clients, and configurations.
Keycloak is container-ready: you can start it with Docker in under a minute. It also has an official Kubernetes Operator for production environments.
Key Concepts
Before writing any code, four concepts worth knowing:
- Realm: the top-level container, roughly a “tenant.” Each realm has its own users, roles, and configurations, isolated from others. You create one per project.
- Client: any application that connects to Keycloak. A React frontend is one client; an Express API is another.
- User: the people in the system. Keycloak handles registration, credentials, profiles, and sessions.
- Role: permissions. You define them based on what your project needs. They end up in the JWT and the application uses them to decide what to show.
Example: you create the techstore realm, register two clients (shop-ui and shop-api), add users Mario and Admin. You assign the admin role only to the second. When Mario logs in, his token tells the application exactly what he can and cannot do.
How Login Works
The standard flow for a web application is called the Authorization Code Flow. It sounds complex, but from the user’s perspective it is three steps:
- The user clicks “Login” in the app → they are redirected to Keycloak’s login page
- The user enters their credentials on Keycloak (not on the app)
- Keycloak redirects the user back to the app with a JWT containing identity and roles
The application never touches the credentials. It receives a JWT (JSON Web Token) that contains who the user is, their roles, and an expiry time. Keycloak signs it with its private key; the app validates it by downloading the corresponding public key. If anyone tampers with the token, the signature no longer matches and the token is rejected.
The app should not have its own login form. If you collect usernames and passwords in the frontend, credentials flow through your code — and you are back to square one: you need to protect them, transmit them securely, and handle every error case. The redirect to Keycloak exists precisely to avoid this.
Try It in One Minute
One Docker command and you are up and running:
docker run -p 8080:8080 \
  -e KC_BOOTSTRAP_ADMIN_USERNAME=admin \
  -e KC_BOOTSTRAP_ADMIN_PASSWORD=admin \
  quay.io/keycloak/keycloak:26.0 start-dev
Open http://localhost:8080, log in with admin/admin, and you have the admin console in front of you. From there you can create a realm, add users, and configure your first client.
On the Keycloak side, getting a working first login takes just a few steps from the web interface: create a realm, add a public client with the app’s redirect URI, and create a user. On the application side, you need to integrate a client library — for example keycloak-js for the frontend or a JWT middleware for the backend — but the actual authentication logic lives entirely in Keycloak.
start-devlaunches Keycloak in development mode. Do not use it in production: it enables HTTP without TLS, uses a local H2 database unsuitable for real load, and relaxes several security settings.
Common Mistakes to Avoid
When getting started with Keycloak, these are the most common traps:
- Login form in the app: if you collect usernames and passwords in the frontend, you are bypassing the entire point of an IdP. Always use the redirect to Keycloak.
start-devin production: convenient for experimenting, but production requiresstartwith an external database (PostgreSQL) and HTTPS configured.- Ignoring roles: Keycloak provides a complete role system. Use it. Do not reinvent authorization with custom logic in the backend.
- Hardcoding URLs: the Keycloak URL differs between local, staging, and production environments. Make it configurable from day one, in both the backend and the frontend. Otherwise the first non-localhost deploy greets you with an unexplained 401.
Conclusion
Keycloak is not “another thing to learn”: it is one less thing to build. Login, registration, password reset, SSO, MFA, user management — all handled by a dedicated, battle-tested component maintained by an active community.
If an application has users, it needs authentication. And authentication is too critical to reinvent every time.
Resources:
- Keycloak Documentation — the official starting point
- Keycloak Getting Started Guide — first setup with Docker
- OAuth 2.0 Simplified — an accessible guide to OAuth 2.0
- OpenID Connect Specification — the standard behind delegated login